
In this article:
- Choose and Connect a Payment Processor
- Configure Billing Settings
- Customize Invoices, Receipts, and Notifications
- Frequently Asked Questions
Gymdesk processes payments through an integrated payment processor, which stores your members' card and bank details—not Gymdesk. Storing payment details with your processor helps with PCI compliance. Those details stay with the processor even if you move to different gym management software.
To choose and connect a payment processor:
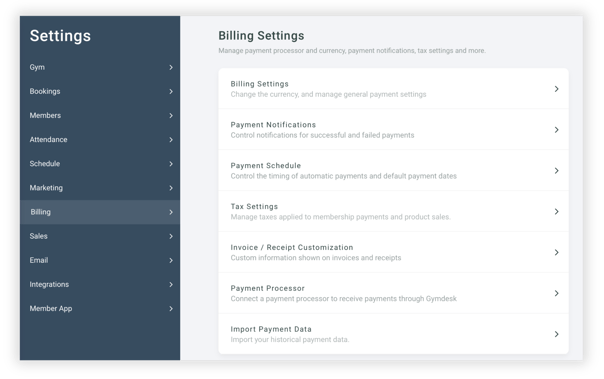
- Go to Settings → Billing → Payment Processor.
- Select the tab for the payment processor you want to connect: Gymdesk Payments, Square, Stripe, Authorize.net or GoCardless.
- Follow the steps on that tab to connect your account. Once connected, a check mark appears on the tab.
Apply for Gymdesk Payments
- Select the Gymdesk Payments tab from the available payment processors.
- Complete and submit the application. Incomplete applications will not be processed.
- The Gymdesk Payments team will contact you by phone or email to finish setting up your account.
Note: Canadian applications take 4 to 7 business days to approve.
To see how much you can save with Gymdesk Payments, see our Pricing. For more information about payouts, funding times, refunds, or card terminals, see Gymdesk Payments - FAQs.
Other payment processors supported by Gymdesk
To connect one of the processors below, open its tab and connect your existing account or follow the steps to create one. Payouts typically reach your bank in 1 to 3 business days. If you already use one of these processors, connecting your account also syncs your members' saved payment methods.
- Stripe: cards plus local bank payments such as ACH, SEPA, BECS, and pre-authorized debits, in 46 countries. See Stripe’s pricing.
- Square: cards only, in 8 countries: the US, Canada, Australia, Japan, the UK, Ireland, France, and Spain. See Square’s pricing.
- GoCardless: bank payments only (no cards), in over 25 countries.
- Ezypay: recurring bank and card payments in Australia, New Zealand, Singapore, Malaysia, the Philippines, and Hong Kong. Its tab appears only for gyms in those countries. Processing fees are billed to your members, not your gym. Apply through Ezypay’s Gymdesk page.
- Authorize.net: best if you already take card payments through your bank or another provider and want to keep that setup. Authorize.net links that account to Gymdesk, and also supports ACH through its eCheck feature (0.8% fee). Don’t have an account? Gymdesk partners with Friendly Payments, which offers US gyms rates from 2.75% + 25¢ and next-day funding.
To connect Authorize.net:
- Open the Authorize.net tab.
- To use Friendly Payments, apply with the application form link on that tab and wait for approval. If you have your own Authorize.net account, skip this step.
- Enter the API Login ID and Transaction Key from your processor, then click Connect Account.
Connect a card reader (optional)
Card readers work with Gymdesk Payments, Stripe, and Square. Follow the steps below to connect your reader and start accepting card payments through point of sale.
- Go to Settings → Billing → Payment Processor and open your processor's tab.
- Click Connect reader and follow the instructions on screen.
After connecting your payment processor, go to Settings → Billing to configure your payment schedule, taxes, and other billing preferences. If you're moving from other software, you can also review how to import existing payment information into Gymdesk.
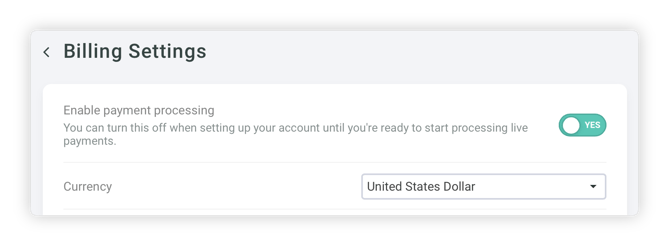
Enable or disable payment processing
Keep payment processing off while you set up billing, so no one gets charged by accident. Turn it on when you’re ready to start collecting payments.
- Go to Settings → Billing → Billing Settings.
- Turn Enable payment processing on or off.
- Click Save Settings.
While processing is off, scheduled payments aren’t charged. On their due date they’re marked Paid with the payment method Skipped.
Choose the currency
Select your gym’s billing currency in Settings → Billing → Billing Settings. Gymdesk supports more than 135 currencies. Currencies marked with * aren’t accepted by Mastercard.
Set up taxes
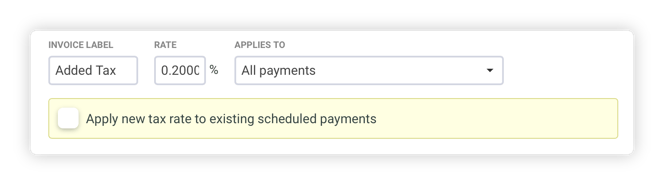
Set the tax rate Gymdesk adds to payments, and how it appears on invoices and receipts. You'll make these changes in Settings → Billing → Tax Settings.
- Invoice Label: what tax is called on invoices. The default is “Tax,” but you can use your region’s name for it.
- Rate and Applies To: apply a rate to all payments or just product sales. You can still adjust the tax on each payment.
- + Add Secondary Tax: add a second rate if you need one (for example, PST and GST in parts of Canada).
- Tax Type: choose how tax is added to your prices. For a $100 membership with 6% tax, Tax Exclusive adds tax on top, so the member pays $106. Tax Inclusive means tax is already in the price, so the member pays $100 and $5.66 of that is tax. Which one you need depends on your country’s tax laws.
Tax changes don't affect payments already created. To apply them to scheduled payments that haven't processed yet, check Apply this tax rate to all scheduled payments before you save.
Payment schedule and related settings
Choose when Gymdesk runs automatic payments, and how it handles manual and prorated ones. You’ll make these changes in Settings → Billing → Payment Schedule. Hover over or tap a setting in the visual below to see what it does.
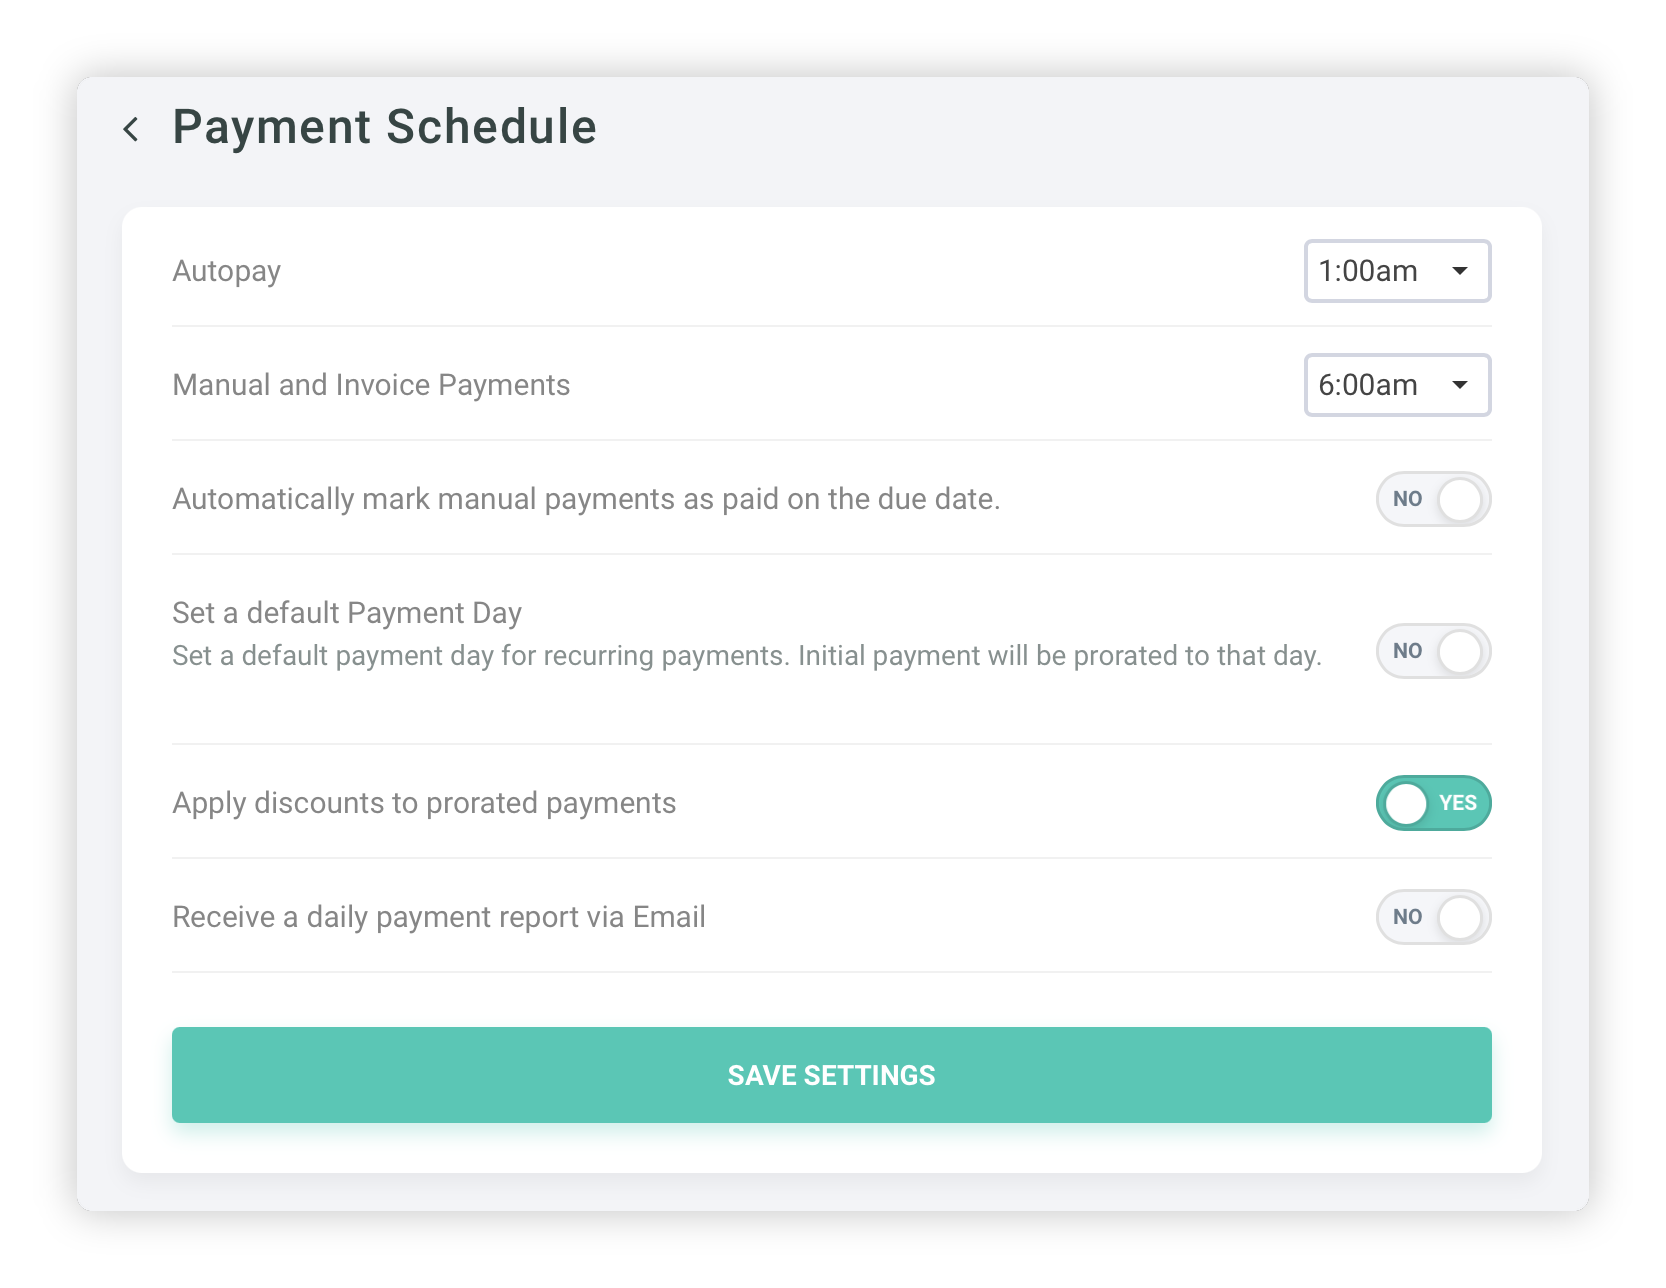
- Autopay*: the time of day card payments and direct debits are processed.
- Manual and Invoice Payments*: the time of day unpaid manual and invoice payments are marked overdue.
- Automatically mark manual payments as paid: marks cash, check, and other offline payments as paid on their due date. No money is collected.
- Set a default Payment Day: bills recurring payments on one day of the month. A member’s first payment is prorated to that day.
- Apply discounts to prorated payments: applies a membership’s discounts to its prorated first payment too.
- Receive a daily payment report via Email: a daily email showing how many payments were paid on time, how many card payments failed, and how many manual payments are overdue.
Set late fees and grace periods
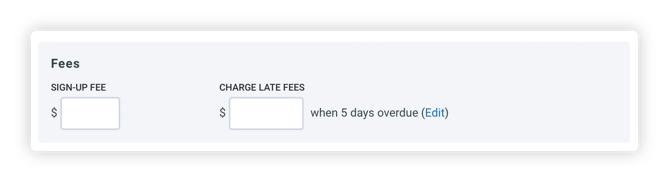
The late fee is set on each membership, so different memberships can charge different amounts. The grace period is one setting for your whole gym: the number of days a payment can be overdue before the late fee is charged.
To set the grace period:
- Go to Settings → Billing → Billing Settings.
- Enter the number of days in Late fee grace period (days).
- Click Save Settings.

To set a late fee, create or edit a membership and go to Pricing → Fees → Charge Late Fees. The "when 5 days overdue" text next to the field shows your gym's grace period, and Edit takes you back to that setting.
Retry failed payments
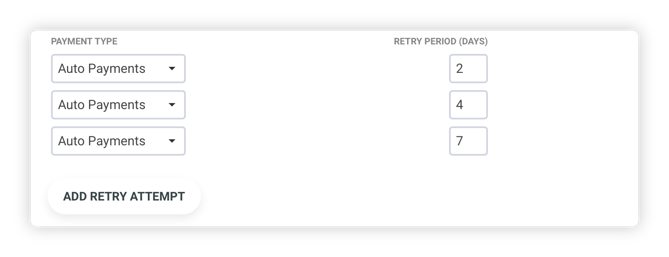
When a payment fails or goes unpaid, Gymdesk can follow up for you. For automatic payments, it tries the charge again, which often succeeds once the member has added funds or updated their payment details. For manual and invoice payments, it reminds the member that their payment is overdue. You’ll make these changes in Settings → Billing → Billing Settings.
- Turn on Retry failed payments.
- For each attempt, choose the Payment Type it applies to (All Payments, Manual and Invoice Payments, or Auto Payments) and set the Retry Period (Days). By default, Gymdesk retries 2, 4, and 7 days after the original payment date.
- To add another attempt, click Add Retry Attempt.
- Click Save Settings.
Migrate existing payment information into Gymdesk
To move your members' existing payment details into Gymdesk, see Migrating Member Payment Information to Gymdesk. If you have questions about payment processing, feel free to drop us a line!
Brand your invoices and receipts, and choose which payment emails and texts Gymdesk sends to members and staff.
Payment notifications
Choose which payment emails and texts Gymdesk sends to your members and staff. You’ll make these changes in Settings → Billing → Payment Notifications.
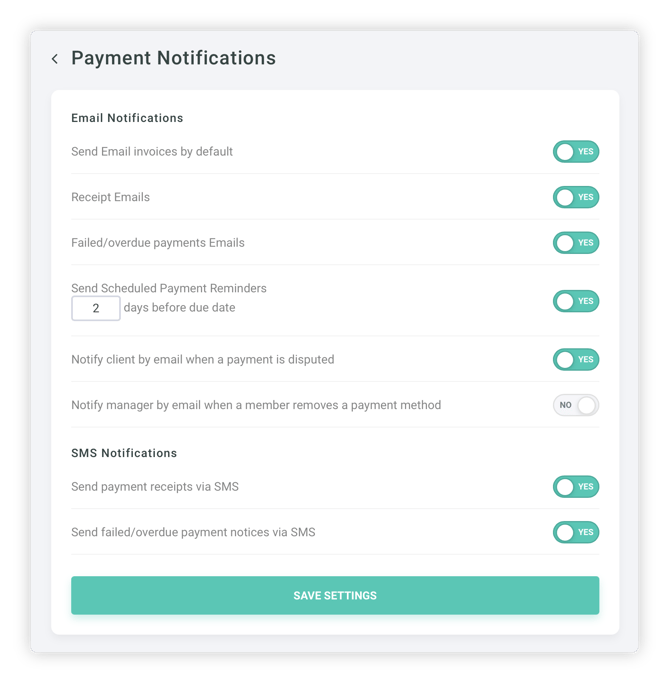
- Send Email invoices by default
Sets whether new membership payments, including recurring ones, send an Email invoice. You can still change it when you create the payment. - Receipt Emails
Sends an Email receipt when a payment goes through. - Failed/overdue payments Emails
Sends an Email notice when a card payment fails, or a manual payment is past due. - Send Scheduled Payment Reminders
Sends Email reminders before scheduled payments. When it's on, you choose how many days before the due date. Reminders help members have funds ready, or cover a legal notice requirement. - Notify client by email when a payment is disputed
Emails the member when one of their payments is disputed. - Notify manager by email when a member removes a payment method
Emails the gym's managers when a member removes a payment method from their account. - Send payment receipts via SMS
Texts the member a receipt when a payment goes through. - Send failed/overdue payment notices via SMS
Texts the member when a card payment fails or a manual payment is past due.
Customize the look of invoices and receipts
Add your business details to the invoices and receipts your members receive. You’ll make these changes in Settings → Billing → Invoice / Receipt Customization.
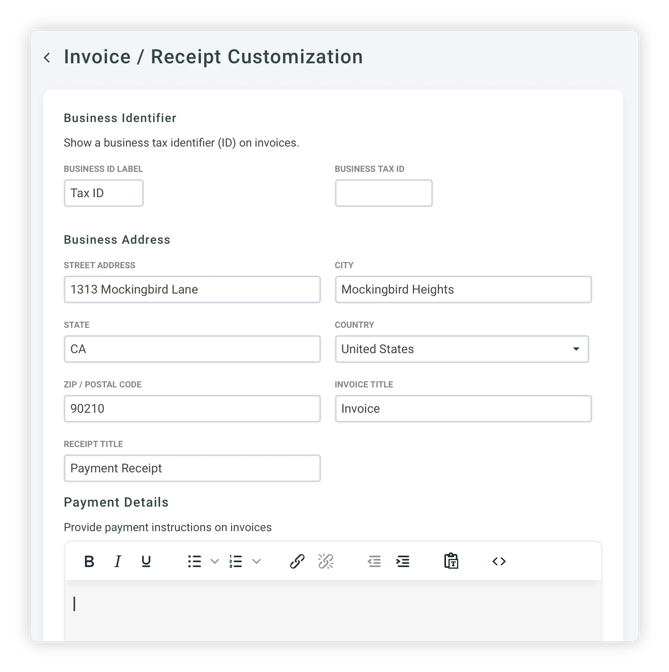
- Business Identifier: shows a tax ID on your invoices. Set the label your region uses (for example, Tax ID, ABN, or VAT number) and enter your number.
- Business Address: the address that appears on your invoices and receipts.
- Invoice Title and Receipt Title: the heading at the top of each document. The defaults are “Invoice” and “Payment Receipt”.
- Payment Details: instructions for paying an invoice, such as bank transfer details, who to make checks payable to, or your payment terms. It appears on every invoice.