
The gym schedule allows you to lay out the weekly training sessions at your gym, as well as scheduled events such as seminars, promotion events, birthday parties and more. This information is used for 4 important features:
- The schedule shown on the gym website
-
Tracking member attendance and session participation
-
Enabling session bookings through the member portal or website
-
Controlling gym access based on membership settings
If you use any of those features, you should fill out the schedule before moving to other areas, which is why we recommend doing this as part of the initial gym set up.
Accessing the Gym Schedule
Go to Gym in the Main Menu
Select → Schedule

Grid or List View
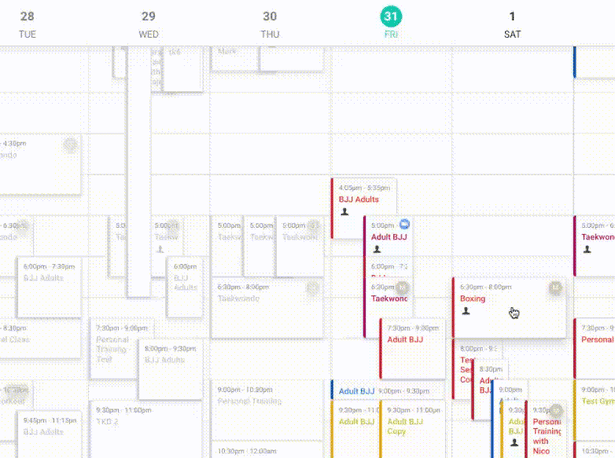
You can now choose between a List view and Grid view for your gym’s schedule. The Grid view displays sessions in a calendar layout with drag-and-drop editing and side-by-side overlapping events, while the List view shows all upcoming sessions in a simple scrollable list. You can toggle between both views using the View Toggle button in the top-right corner of your schedule.
Viewing Multiple Schedules
If your gym uses more than one schedule (for example, separate calendars for classes, private lessons, or events), you can switch between them using the Schedule dropdown menu at the top of the calendar.
The dropdown also includes an All Schedules option, which displays classes from every schedule in a single combined view. This makes it easier to see everything happening across your programs without having to switch back and forth.
Editing Sessions on Your Gym Schedule
The grid-based schedule works like Google Calendar, letting you add, edit, and manage sessions directly from the calendar.
To create a class, private lesson, or event, click the desired day and time slot. The Edit Session window opens, where you can set details across four tabs: Details, Booking, Skills, Description, and Settings.

Edit Session: Details
The Details tab captures the essential information for your session—its name, schedule, lead instructor, and associated program.
-
Title – Name of the session (max 250 characters).
-
Color – Assign a color for easy identification on the schedule.
-
Date & Time – Set the date and time for when the session begins and ends. Sessions now use specific start and end times instead of durations (e.g., 5:30 PM–6:15 PM).
-
Recurring Event – Check this box if you want the session to repeat. You can now:
-
Select multiple days per week (e.g., Monday, Wednesday, Friday).
-
Add multiple date ranges for different seasonal schedules.
-
Allow sessions to repeat indefinitely or end on a specific date.
-
-
Program* – Assign the session to a specific program.
-
Instructors – Select one or more instructors who will lead the session.
** Note: Assigning a session to a program restricts bookings and check-ins to members whose memberships include that program. Members without access to the assigned program will not be able to book or check in to the session.
Edit Session: Booking
The Booking tab allows you to set how members reserve spots in a session, manage who can see and book each session, define session pricing, and specify attendee limits.
-
Available for Booking – Makes the session bookable through the website and member portal. People will be able to book private sessions, the entire gym for events and any other kind of appointment you would like to create.
-
Capacity – Limit the number of attendees for group sessions.
-
Enable Waitlist* – Allow members to join a waitlist if the session is full. When a participant cancels, the first person on the waitlist is automatically moved into the session.
**Note: The waitlist currently works automatically—manual additions are not supported. Increasing the session limit after it’s fully booked will not reopen spots for waitlisted members.
- Cost – Add one or more pricing options if the session requires payment at booking. You can create multiple price tiers (for example, Early Bird and Drop-In rates). Each pricing option appears as its own booking type on the schedule and can have unique visibility rules, fees, and participant limits.

When you enable pricing, you’ll also see options in the dropdown menu to control who the charge applies to:
-
-
Free Booking – No charge is applied; anyone booking can reserve the session at no cost.
-
Charge Everyone – All bookings (members and visitors) must pay the listed cost.
-
Non-Members – Only visitors or non-members are charged. Members can book without payment.
-
Website Booking – A charge is applied only to bookings made through your website.
-
-
Save Booking as a Lead – Automatically add bookings to your leads list. This is useful if you create a bookable slot for a trial and want to make sure to follow up with this person later.
- Enable Waitlist - You can allow members to join a waitlist once a session has reached its booking capacity. If someone cancels, the first member on the waitlist will receive their slot and an Email notification.
- Visibility Settings:
- Show in Member Portal (visible to members and visitors)
- Show Only to Members (restricted to logged-in members only)
- Show Only to Managers (hidden from members and visitors; only staff can book it from the manager account)
IMPORTANT: If a session is set to Show Only to Managers in the Booking tab, it will not appear on the public schedule or in the member portal — even if those options are enabled in the Settings tab.
To keep a session visible while restricting bookings, the best approach is to create a duplicate session:
-
One with booking enabled (restricted as needed).
-
One without booking, for visibility only.
Edit Session: Skills
The Skills tab lets you assign specific skills or techniques to a session. You can search, filter, and link skills to programs, ranks, or categories to streamline your training progression tracking.
-
Search Skills – Quickly find skills by name, program, or category using the search bar.
-
Filter by Program or Rank – Narrow down your view to skills relevant to a specific program or belt/rank.
- Recurring Skills – When enabled, the selected skills will automatically apply to all future instances of a recurring session.

Edit Session: Description
Use the Description tab to add details about the session that will be displayed on your public website schedule and on the booking page for that session.
You can include:
-
A short overview of what the session covers
-
Equipment or preparation details
-
Instructor notes or level recommendations

Edit Session: Settings
The Settings tab controls how each session behaves and appears across your schedule, website, and member portal. Here, you can control its visibility on your public schedule and in the member portal, enable attendance tracking, set up remote options, and determine how the session is counted toward membership usage.

-
- Show on public schedule: Displays the session on your website’s public-facing schedule.
Reminder: If the Booking tab visibility is set to Show Only to Managers, that setting will take precedence — meaning the session will not appear publicly even if this option is checked.
-
-
Age Range: Allows you to set a minimum and maximum age for the session.
-
Attendance Tracking: Session will be available for attendance tracking on the check-in screen.
- Session Count: You can determine if you want a specific session to count for more than 1 session when counting towards promotion requirements, as well as membership session counts. For example, if I have a 10-session membership and you set a Session Count to "2", this will deduct 2 sessions from the membership.
-
-
-
Remote session: You can mark a session as remote - this will show an icon on the schedule (the "Zoom" logo) indicating it's a remote session. Optionally, you can also include a link to remote training (such as a Zoom or Google Meet link), and clicking on the remote icon will take the member there.
-

Creating Recurring Sessions

Reminder: If you offer a session that repeats on a consistent schedule but occurs at different times—for example, Kickboxing on Tuesdays at 5:00 PM and Fridays at 7:00 PM—set up each as its own recurring session. Each recurring session operates independently, so adjustments made to one will not affect the other.
Editing Sessions with Drag and Drop
With drag-and-drop editing, you can move sessions directly within the schedule grid, without needing to open a session window. This allows you to quickly and easily adjust your calendar as needed.
You can change the session time by clicking and dragging the session block to a new time slot on the same day. The session will automatically update once dropped. You can also drag a session to a different day to move it entirely.
IMPORTANT: Currently, participants aren’t automatically notified when a session’s date or time changes. This functionality is planned for a future release. In the meantime, you can manually notify attendees of schedule updates by sending a message from Gym → Bookings → Upcoming List.
Reminder: If the session you’re moving is part of a recurring series, Gymdesk will ask whether to update just that session or every session in the series. This lets you adjust a single date—such as for a holiday—without changing the entire schedule.
Managing Participants from the Schedule (Quick Actions)
From the Participants List inside any session’s pop-up, managers can now take direct actions without leaving the Schedule screen:
-
Check in participants directly from the list.
-
Cancel existing bookings to free up space.
-
Book participants again in just one click.
-
View medical notes pulled from the member’s profile.
-
Add session-specific notes for internal reference or instructor updates.
These updates make it easier to manage attendance, track important details, and maintain consistent communication across sessions—all from one place.

Marking Gym Closure
You can mark the gym as closed for the entire day on the schedule by clicking the "X" icon at the top-right of the day column on the schedule.

IMPORTANT: When you mark the gym as closed for a specific date, new bookings will be blocked, but any existing sessions will remain active until you manually cancel them and notify participants.